What You’ll Learn in the Rainy Bear Tutorial
- How to create a bear vector illustration
- How to make a bear in Illustrator
- How to draw an umbrella in Illustrator
- How to draw a tulip in Illustrator
- How to create a vector raindrop
1. How to Make a Bear’s Head in Adobe Illustrator
Step 1
After you’ve opened Adobe Illustrator, create a new document (File > New). Enter 850 px Width and Height in the new dialogue window and press OK. This will be your new artboard.
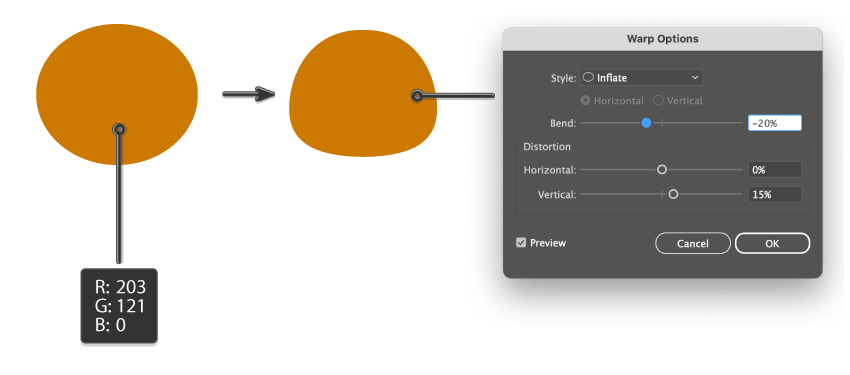
First, let’s create the head of our teddy bear vector illustration. Hit the Ellipse Tool (L) and draw an ellipse (fill color R=203, G=121, B=0). Then, we want to deform it a little: go to Effect > Warp > Inflate. In the new dialogue window, enter the options you see below and press OK. While keeping it selected, expand the shape (Object > Expand Appearance) so it won’t get deformed later.


Step 2
This bear vector illustration definitely needs ears. Using the Ellipse Tool (L), draw a small ellipse on top of the head. Incline it a little to the left. While this small ellipse is selected, hit Control-C and then Control-F to create a copy in front. Make the copy smaller and change its fill color to R=181, G=92, B=0. This is one completed ear of the bear vector illustration.
Now, we want to create the other ear. Keep the first one selected, and take the Reflect Tool (O) or hit the O button on your keyboard. Then press Enter. It will open a new Reflect dialogue window. Be sure to check Axis Vertical, Angle 90 degrees, and press Copy. This manipulation will create a second ear.
Now you should move it to the right, on the other side of the bear vector illustration. To move this second ear in a straight line, keep the Shift button pressed on your keyboard. Be sure the ears are placed symmetrically.


Step 3
Our bear vector art needs eyes. Use the Ellipse Tool (L) again to draw the first one. To create an even circle, hold the Shift key while drawing. Then, change its fill color to R=115, G=47, B=0.
Let’s add a highlight to the eye. Draw a small white circle and place it in the upper-right corner of the eye.
To create another eye for our vector bear, select those two circles (brown and white) and drag them to the right while holding the Shift and Alt keys. Shift will move them straight, and Alt will create a copy. Be sure the eyes are placed symmetrically.


Step 4
Now, our vector teddy bear needs a nose. Once again, use the Ellipse Tool (L) to create an ellipse. Make sure its fill color is R=251, G=199, B=136. While keeping the ellipse selected, go to Effect > Warp > Inflate. In a new Warp Options dialogue window, enter the options you see below and press OK. Next, expand the shape (Object > Expand Appearance).
Then, make yet another brown ellipse on top of it. The fill color is R=115, G=47, B=0. Again, go to Effect > Warp > Inflate, and enter the options you see below. Add a small white ellipse as a highlight on the upper-right corner of the brown inflated ellipse.
Finally, expand the whole nose (Object > Expand Appearance) so it won’t lose its shape.


Step 5
To add even more cuteness to the bear, let’s give him some cheeks. Using the fill color R=207, G=84, B=21, create a small ellipse under the bear’s eye. Keep it selected, and while holding the Shift and Alt keys, move it to the right. You just created two cheeks! Place them symmetrically.


2. How to Create a Raincoat in Adobe Illustrator
Step 1
Now let’s dress our bear up! First, let’s make a coat collar for our bear vector illustration. Using the Rectangle Tool (M), draw a rectangle. Set the fill color to R=255, G=219, B=153. After that, go to Effect > Warp > Arc, and enter the options you see below. Press OK. That’s the first part of the vector bear collar.
Expand the shape (Object > Expand Appearance).


Step 2
Place this first part under the bear’s head, on the left side. To create the other part of the collar, take the Reflect Tool (O), or just press the O button on your keyboard and then the Enter button. It will bring up a new Reflect dialogue window. Make sure to enter Axis Vertical, Angle 90 degrees, and press Copy. After this, you will have another collar part. Place it symmetrically.
You will notice a space between the bear’s head and the collar, right where the neck should be. Just add an ellipse behind: create this ellipse, and while keeping it selected, right-click and select Arrange > Send to Back.


Step 3
Let’s create the main part of the raincoat using the Rectangle Tool (M)—the fill color is R=252, G=195, B=0. Then, go to Effect > Warp > Bulge, because we want to add a corresponding shape to our chubby bear. Enter the options you see below in the image, and expand this shape.
While this new shape is selected, create a copy in the back: press Control-C, Control-B. Change its color to R=234, G=160, B=0, and stretch it a little horizontally. With this manipulation, you will visibly separate the body from the arms.


Step 4
Every raincoat needs some cute buttons. Let’s make them! Change the fill color to R=255, G=219, B=153. Hit the Ellipse Tool (L) and draw a tiny circle. Hold Shift to create an even circle.
Then make a copy in front (Control-C, Control-F), delete its fill color, and make the stroke color R=234, G=160, B=0. Now you want to expand this new circle with a stroke and no fill: Object > Expand… In the new Expand dialogue window, put a tick near the Stroke, and then press OK. This is so that later if we make it smaller or bigger, the width of the stroke will remain the same.
Next, let’s add the thread that holds the button to the coat. Hit the Rounded Rectangle Tool and draw a small, long rectangle. It’s the first thread.
To create another thread, create a copy in front (Control-C, Control-F). Then, while holding the Shift button, rotate it to the right. Holding the Shift button allows you to rotate any shape to 45°, 90°, 180°, etc.
Place the second thread symmetrically. Group the whole button for your convenience (right-click > Group).


Step 5
Place this button on the teddy bear’s coat, and adjust its size to your liking.
Keep it selected and, while holding the Alt and Shift buttons at the same time, move the raincoat button down a little bit. Holding Alt will create a copy, and holding Shift allows you to move it in a straight line.


Step 6
Now our vector teddy bear needs arms. Select the bear’s body to pick its fill color. Press Shift-X to change the fill color to the stroke color. Now, look at the Stroke panel. If you don’t have it open, go to Window > Stroke. Make the stroke Weight very high, around 30 pixels. The stroke weight you need depends on how big the raincoat is.
Take the Arc tool and create a curved line. Place it behind (Control-X, Control-B). Then, using the Direct Selection Tool (A), move the anchor points and handles of the curved line close to the raincoat to turn it into the raincoat sleeve.
In the same way, create another curved line and turn it into the second sleeve. Make sure to turn the second sleeve upwards so that later on the bear can hold an umbrella.
Click on the bear’s head to find its fill color so that you don’t need to enter the RGB number manually. Using the Ellipse Tool (L) and while holding the Shift key, create a small circle. It will be the bear’s hand. Place the hand behind the sleeve (Control-X, Control-B).
Create another hand and place it near the second sleeve and behind it.


3. How to Create Boots in Adobe Illustrator
Step 1
Now, our vector teddy bear needs a pair of cute boots. Start with the Rectangle Tool (M) and create a red rectangle (R=255, G=95, B=55).
Add an ellipse at the bottom using the same fill color.
If you have a newer version of Illustrator, then near the selected ellipse you will notice a handle on its right side. Use this handle and move it clockwise until you get half of the ellipse. We will use it as the bottom part of the boot.
Keep this half-ellipse selected, and make a copy in the back (Control-C, Control-B). Don’t remove the selection. Stretch this back copy up, and change its fill color to R=245, G=44, B=0.
Keep the same fill color and use the Rounded Rectangle Tool to create the sole of the boot: just a small, long, rounded rectangle at the bottom. The whole boot is finished! Group it for your convenience (right-click > Group).


Step 2
Click on the bear’s head to get its fill color because we need it for his leg. Create a rectangle and place it under the raincoat.
Place the red boot on the leg.
Select the leg and the boot. Take the Reflect Tool (O) and press Enter. You will most likely already have all the needed options selected (Axis Vertical, Angle 90 degrees), so just press Copy in the new dialogue window. You just created a copy of the leg and boot. Move it to the right side of the bear. Be sure to place it symmetrically. Look how cute the teddy bear is!


4. How to Draw an Umbrella in Illustrator
Step 1
Let’s start to create an umbrella vector illustration from an ellipse. The fill color is R=255, G=95, B=55.
Then, change the fill color to any color you like, as it just needs to be different and clearly visible. Draw a small ellipse and place it as shown in the image below. Be sure that a small left part of the new ellipse (the purple one in the image) overlaps the big red one on the left side.
Move the small ellipse to the right while holding the Alt and Shift keys. After that, press Control-D a few times, which will repeat the last movement. Create a few purple ellipses like this. Be sure to place the purple ones symmetrically with the big red one.
Now, select all of the ellipses. Go to the Pathfinder panel and press Minus Front. Can you already recognize an umbrella vector? Ungroup these two shapes (right-click > Ungroup) and delete the bottom shape by hitting the Delete button.


Step 2
Let’s create a handle for your umbrella vector art. Delete the fill color and set the stroke color to R=115, G=47, B=0. Draw a rectangle. On the Stroke panel (Window > Stroke), you can adjust the Weight of this stroke.
Now you want to go to View > Show Corner Widget. Of course, you can create a rounded rectangle instead, but if you do then you won’t know about this feature! So now the rectangle has small circles in every corner. You can drag them inwards to make this rectangle a rounded corner rectangle.
Take the Scissors Tool (C) and click on the anchor points shown in the image below. You should have two parts of the rounded rectangle. Delete the upper left part. Now it’s a handle of the umbrella vector art. Place it behind.


Step 3
To make the vector umbrella even cuter, let’s add some decor to it. Create a small circle (fill color R=245, G=44, B=0), and place it on the corner of the umbrella.
By holding Alt and Shift and then Control-D to repeat the last movement, create more copies of this decor. Group the whole umbrella.


Give the vector umbrella to the teddy bear.


5. How to Draw a Tulip in Illustrator
Step 1
To create our tulip vector art, we’ll start with a red ellipse (fill color R=255, G=95, B=55).
Create a copy on the back, change its fill color to R=245, G=44, B=0, and stretch it a little horizontally. This is so that the front petals will be separated from the back ones.
Now, we should create the back petals of the tulip vector. You can copy the front one and paste it in the back (Control-X, Control-B). Tilt it and shift it a little to the left.
Then, create another one using the Reflect Tool (O): while selecting the left petal, press the O key and then the Enter key. After making sure all the options are correct, press Copy. Move the right petal to the right, symmetrically to the whole tulip.


Step 2
Next, our tulip vector art needs a leaf. Create a green long vertical ellipse with the fill color R=127, G=182, B=19.
Using the Anchor Point Tool (Shift-C), click on the top and bottom anchor point of the leaf.
And now you have a simple leaf.


Step 3
Let’s continue to create our vector tulip. Change the fill color you have to the stroke color by pressing Shift-X or pressing the Swap Fill and Stroke button on your left panel. On the Stroke panel, feel free to adjust the Weight of this stroke. On the same panel, change the Cap option to Round Cap. This is the vector tulip stalk.
Take the leaf you created before, and place it close to the stalk.
To make the leaf more natural, let’s add some effects. Go to Effect > Warp > Flag and enter the options you see below. Press OK. Expand this shape (Object > Expand Appearance).
Finally, make a copy of the leaf to create a new one. While selecting the left leaf, press the O key and then the Enter key. Make sure you have the options you need, and press Copy. Move the new leaf to the right, symmetrically to the whole tulip.


Step 4
To make our bear vector illustration more cheerful, create more tulips by copying the existing one. Just remember, when you make a tulip smaller or bigger, you need to adjust the stroke Weight on the Stroke panel.


6. How to Create a Background in Adobe Illustrator
Step 1
Take the Rectangle Tool (M) and click on your artboard. In the new dialogue window, enter 850 px Width and Height. Press OK and then change its fill color to R=162, G=211, B=140. This will be our background.
Cut the background (Control-X) and place it behind everything you’ve created so far (Control-B). Make sure your background stays in the middle of your artboard.
If you want to place your background exactly in the middle of the canvas, go to the Align panel, and check Align to: Align to Artboard (bottom-right corner). When you check this, any items that you choose to align will be aligned to your artboard. Now you need to select the object that you want to align. In the Align Objects section, press Horizontal Align Center and Vertical Align Center. This is how you put any object exactly in the middle of your canvas or artboard.


Step 2
Create an even circle (fill color R=202, G=237, B=184) and place it in the middle of the canvas.


Step 3
Draw a small horizontal rectangle at the bottom (fill color R=178, G=224, B=148). This will be some simplified grass.


Step 4
Now we want to cut this rectangle so that it appears to be inside the circle. To do this, make a copy of the circle in front (Control-C, Control-F), and while holding the Shift key, select the rectangle at the bottom. While keeping the two shapes selected, go to the Pathfinder panel and press the Intersect button in the Shape Modes section. Your result should be similar to the image below.


7. How to Make a Raindrop in Illustrator
Step 1
Now, place our vector teddy bear and tulips on the background.


Step 2
Now, we’re at the last part of our creation, where I show you how to make a raindrop in Illustrator. Start by creating an ellipse. The fill color should be white. I added a black outline just for better visibility; you don’t need the stroke.
Then, using the Anchor Point Tool (Shift-C), click on the upper anchor point of the ellipse. You will get a sharp corner.
Move this anchor point (the corner) up using the Direct Selection Tool (A). And here is your rain vector art!


Step 3
Place the vector raindrop on your illustration. While holding the Alt button, move the raindrop to the side to create a copy. Now create more copies, keeping them inside the light green circle. There you go: your vector rain is finished!


Congratulations!
What a cute picture! I hope it taught you something new and you enjoyed making it. Thanks for following this tutorial with me. Keep experimenting with what you’ve learned and exploring more possibilities. Looking forward to our next session!
Recommended Resources From Envato Elements
Here are some recommended resources from Envato Elements to add to your illustration. It’s a subscription-based marketplace where you can get unlimited downloads. If you’re looking for a bear vector illustration, a vector raindrop, or a vector umbrella, you can find everything there. It’s the perfect place to get endless graphics.
1. Brown Paper Textures (JPG)


If you want to give your teddy bear vector illustration a textured or vintage feel, try using these high-resolution textures and backgrounds. This can make your art look aged or hand-made, adding charm and a classic vibe.
2. Cute Cartoon Bear With Homemade Cake (AI, EPS, JPG, PNG)


In my tutorial, I demonstrated how to craft a bear illustration using simple shapes. Now, let’s explore a hand-drawn illustration. This drawing can give you inspiration and ideas for your own creations.
3. Water Drops and Splashes Set (AI, EPS, JPG, PNG, PDF, SVG)


Take a look at this set of vector raindrops and splashes. It’s a method to make your raindrops appear more realistic. By incorporating these vector elements, you can elevate the realism in your projects, making each raindrop not just a simple representation but a much more realistic illustration.
4. Watercolor Illustration Set of Tulips (PNG, PSD)


Here are some charming watercolor tulips that you can use if you’re looking to add texture to your graphics. These delightful illustrations offer a unique blend of color and depth, perfect for enhancing your designs with a natural and artistic touch.
5. Umbrella Set Concept in a Flat Cartoon Design (AI, EPS, JPG, PNG, SVG)


Explore this set of vector umbrellas, designed to spark inspiration for your projects. This collection can encourage you to add an interesting twist to your umbrella designs, with a diverse range of styles and patterns. It’s a fantastic resource for infusing creativity and uniqueness into your work, ensuring your umbrella designs stand out with a distinctive charm.
If You Want to Learn More, Take a Look at These Tutorials
If you’re eager to expand your knowledge, consider exploring the tutorials available on Envato Elements. This platform offers an extensive collection of resources, providing ample opportunity for learning and growth. Whether you’re a beginner or an experienced creator, you’ll find tutorials that cater to various skill levels and interests, all designed to enhance your abilities and inspire your creative projects.


