You know Adobe Premiere Pro as a powerful video editor. But what do the best videos include? Audio, of course! And inside Premiere Pro, you’ll find an array of ways to edit and work with audio. Let’s learn how to adjust volume in Premiere Pro.
In this tutorial, you’ll learn how to edit volume in Premiere Pro. We’ll look at two great ways to do it. When you think of how to change audio levels in Premiere Pro, we’ve got you covered. Imagining how to adjust audio volume in Premiere Pro? You’ve come to the right place.
Let’s get started!
How to Adjust Volume in Premiere Pro (Quickly and Easily)
Adobe Premiere Pro doesn’t offer just one way to adjust volume. Below, we’ll briefly explore both of the top methods. One lets you level volume up (or down) with a single click. The other focuses on adjusting the audio gain, another great way to learn how to adjust audio volume in Premiere Pro.
We’ll demonstrate using a music track from Envato Elements. You can download it here to follow along!
Now, let’s learn how to adjust volume in Premiere Pro!
1. Adjust Clip Volume with a Single Click
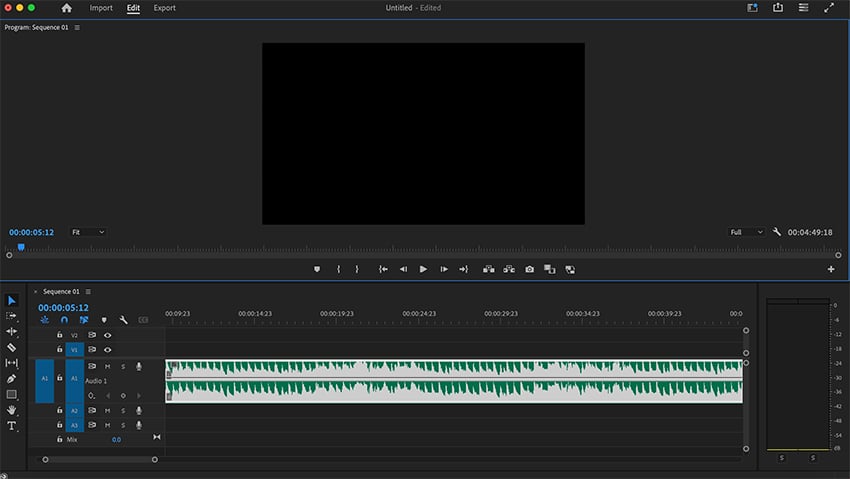
When you’ve added audio to Adobe Premiere Pro, you’ll find it in the Timeline. The Timeline is the panel found in the bottom center of your Premiere Pro screen. Think of this as the control hub for how to adjust audio volume in Premiere Pro.
It’s where you control all of the media in any project. Audio tracks in the Timeline are labeled A1, A2, and so on. Each individual track will appear as a horizontal green bar.
The easiest way to adjust audio in Premiere Pro is all at once. In other words, you can raise or lower the volume by the same amount across a full track.


When you look at an audio track on your Timeline, you’ll see a horizontal line running through the clip. This represents the default volume level of your clip. Want to raise the volume? Click and hold your cursor on the line, and move upwards. You’ll see a number denoting the decibel increase of your edit.


Want to know how to lower volume on Premiere Pro? Click and hold on the line, and move downward. The volume will decrease. This is the fastest and easiest way to adjust volume in Premiere Pro.
2. Make Changes to the Audio Gain
Audio gain is another way to adjust the volume in Premiere Pro. When you record audio, gain is the amplification that is given to the sound that you capture.
Adjusting the gain up or down essentially changes the volume of the audio. Here’s how to lower volume on Premiere Pro by changing the gain. You can also use this method to increase the volume!


Navigate to the audio track in your Timeline. This time, right-click on the track itself. When you do, you’ll see a list of options appear on a popup menu. From this list, click Audio Gain. The Audio Gain menu will open. On it, ensure that the Adjust Gain bubble is selected.


Want to know how to lower volume on Premiere Pro? To lower the volume, choose a number below 0 decibels. Want to boost the volume? Choose a number above 0 instead. Keyboard it into the box, then click OK. You’ve just mastered how to change audio levels in Premiere Pro!
The Top Source for the Ultimate Adobe Premiere Pro Templates (With Unlimited Downloads)
Adobe Premiere Pro works best with premium video templates. And the top source for these premium templates is Envato Elements. For a flat monthly rate, you can choose from thousands of options, with more added every day!


That’s not all. Elements includes millions of digital assets. You’ll enjoy fonts, stock photos, music, and audio effects. These are the perfect tools to use in your next amazing video production in Adobe Premiere Pro.


Elements makes it incredibly easy to find the best digital content for projects of all kinds. That’s thanks to the powerful new AI search tool. Simply describe your project needs in a few words. When you search, Elements will explore the vast collection and find the very best content for your needs. It saves you time and helps each project look its very best.
So, what are you waiting for? Join Envato Elements today and get started!
Become an Expert Editor With the Premiere Pro Tutorial Course
Trying to master Adobe Premiere Pro in 2024? With our full Premiere Pro Tutorial by David Bode, you can do exactly that. This is a comprehensive video course that guides you to expertise, even as a Premiere Pro beginner!
With a runtime of over six hours, this is a robust and detailed course. But the lessons are broken into 43 bite-sized pieces. If you only have a few spare moments, you can use them to learn Premiere Pro – bit by bit!
In this course, David covers an array of topics. He will also teach you how to change audio levels in Premiere Pro, one of the lessons included in the course. Don’t hesitate to start learning! It’s the best investment you can make in yourself as a video editor.
More Premiere Pro Resources
You’ve already learned how to edit volume in Premiere pro. There’s no reason to stop here!
Premiere Pro is a deep app. Here are more top Premiere Pro tutorials and resources to try from Envato Tuts+:
You Just Learned How to Edit Volume in Premiere Pro
In this tutorial, you learned how to adjust audio volume in Premiere Pro. We explored multiple ways to do it. Adjusting the full track volume is quick and easy! You can adjust right on your Timeline. Or, you can use the Audio Gain menu to dial in specific levels and settings for any audio that you work with. Whichever approach you choose, it’s a key to success as a video editor.
Never forget to give your audio attention as you edit your videos. When you do, you – and your audience – will appreciate the results!


