You can use Affinity Photo to adjust colors and replace colors in a few different ways, and each method has advantages and disadvantages. Let’s explore three methods in the following steps.
If you don’t have the time to learn how to change color in Affinity Photo, you can always try Envato Elements, where you will find a large selection of photos that are ready to be used in your projects. You can download as many as you wish with a subscription.
What You’ll Learn
- How to change color using the Color Replacement Brush Tool
- How to change color using HSL
- How to change color using Recolor
Tutorial Assets
You’ll need the following resources in order to complete this project:
Step 1
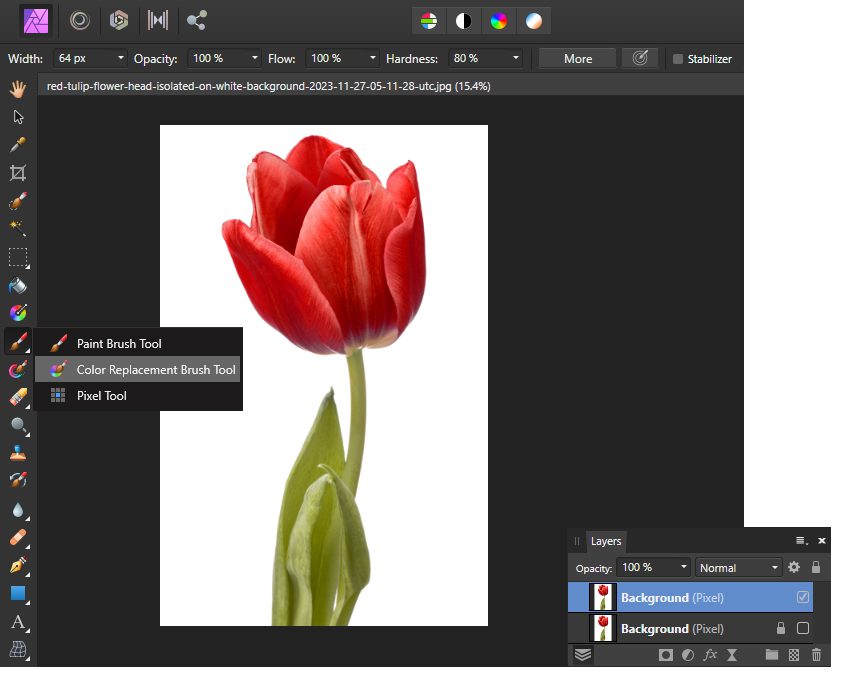
Launch Affinity Photo, go to File > Open, and locate the image you want to work on. I’m using the Red Tulip photo, which is perfect for demonstrating this technique. Duplicate the Background layer by right-clicking on the layer and choosing Duplicate from the menu. Do this in case you want to keep the original layer for comparison or to start again later.
Locate the Color Replacement Brush Tool. It is hidden under the Paint Brush Tool in the toolbar.


Step 2
First, choose the desired color from the Color panel. I’m using purple, but feel free to choose any other color. If you position the center of the brush over the flower, you will then see a preview of how it’ll look if you apply the brush. This is useful in case you decide to change the color shade. Now, click once and hold down the mouse button while moving the brush over the entire flower to paint it. It will change to the new color. Easy, right?
Notice how the white background and the flower’s stem are not affected even if you brush over them. This is because when you first clicked on the red flower, the brush took red as the sample color, so it will only detect and replace red shades of similar intensity. For this reason, I recommend using this method for images with a white or black background or for complementary colors. If there’s a strong contrast between the subject and the background, this method will work wonderfully.
The bad news is that if you want to change the color a second time, you need to start over and paint the subject again.


Step 3
In the image below, you can see the brush settings that I used:
- Width: 500 px (adjust the size depending on your image and subject)
- Opacity: 100%
- Flow: 100%
- Hardness: 80%
- Tolerance: 30% (adjust this depending on your image and subject)
- Sample continuously: Checked
- Contiguous: Checked
Once you’re done, zoom in on the flower and check the result. Pay particular attention to the edges as there might be some areas that were not recolored. You can paint over those areas again and choose a smaller Width value.


2. How to Change Color Using HSL
Step 1
Now, let’s learn how to change color in Affinity Photo by adding an HSL Adjustment layer to the image, which is a better method. Let’s take a look!
First, open the image that you want to recolor. I’m using the Woman in Brown Suede Jacket photo, and I will change the color of her matching jacket and pants. Duplicate the Background layer in case you want to keep the original image for later use. Now, click on Adjustments at the bottom of the Layers panel and choose HSL from the menu. This will add an HSL Adjustment layer above your image and will also open the HSL window.


Step 2
In the HSL window, first click on the red color sample (or other) as this will activate the Picker Tool. Click on the Picker box and use it to sample the color of the jacket/pants which is burned orange by simply clicking once on them. After that, you can move the Hue Shift slider to the left or right to change the color of the clothes as you want. Also adjust the Saturation and Luminosity, if needed.


Step 3
This image is a great example of an actual situation that might happen in the Affinity Photo color replacement process. The HSL adjustment picks up colors from areas you don‘t want, like the face, hair, and hands, because they have similar shades. Don‘t worry—it‘s an easy fix with a mask.
While the HSL Adjustment layer is selected, click on Mask Layer at the bottom of the Layers panel. Now, grab the Paint Brush Tool (B), set the color to black in the Color panel, and start painting over the face, hair, and hands to exclude those areas. Adjust the brush size accordingly.


Step 4
You can reopen the HSL window at any time by double-clicking on the HSL Adjustment layer thumbnail. Move the sliders to generate a new color.


3. How to Change Color Using Recolor
Step 1
The Recolor adjustment works similarly to the HSL adjustment. Let’s see!
First, open your favorite image with Affinity Photo. I am using the Beach Hut photo. Go to the Layers panel, click on Adjustments, and choose Recolor from the menu. This will add a new Recolor Adjustment layer above the image and open the Recolor window. There, you can move the Hue slider to the left or right to find the color that you like, which in my case is blue. Feel free to adjust the Saturation and Lightness too, if needed. Notice how this recoloring method affects the entire image, but don’t worry—we’ll fix that next.


Step 2
Next, use the Pen Tool (P) or the Selection Brush Tool (W) to make a selection around the areas that you want to be recolored. Zoom in and check if the selection is precise, and make any necessary adjustments. When you’re happy with it, click on Mask Layer at the bottom of the Layers panel while the Recolor Adjustment layer is selected. Now, the blue color is visible only where I want it to be visible. That’s it!


Step 3
You can also produce other colors very easily. Just double-click on the Recolor Adjustment layer thumbnail to open the Recolor window again and move the sliders. You can also change the Blend Mode and the Opacity to obtain the desired result.


Congratulations! You’re Done
You have successfully learned how to change color in Affinity Photo. Make sure to check out Envato Elements, which is an excellent resource for photos that you can recolor and edit to create beautiful designs.
Now that you know how Affinity Photo color replacement works, feel free to explore all the settings and options available and generate the result that is perfect for your project. Find the right method for you!
Let’s take a closer look at their advantages and disadvantages:
| Color Replacement Brush Tool Method |
|
| HSL Method |
|
| Recolor Method |
|


