What Are Photoshop Drop Shadows Used For?
The traditional use for a Photoshop drop shadow is to simulate 3D depth in a 2D image. This is done by creating an offset shadow effect behind an object to indicate that the object is hovering above the background in 3D space.
Below you will see an example of how to make a drop shadow in Photoshop. The shadow can indicate how big the light source is and where it is coming from, as well as how far away an object is from the background. By changing only the settings of the Photoshop shadow effect, you can dramatically change the look of an image.


Let’s take a look at how to add a drop shadow in Photoshop using the handy Layer Styles dialog box.
The Layer Styles Drop Shadow Dialog Box
Let’s take a look at this first way of creating a drop shadow in Photoshop. The Drop Shadow Dialog Box is a good place to start for beginners because the settings are pretty basic and will give you an overall feel of how to use the rest of the effects as well. A subtle drop shadow in Photoshop is also one of the best effects to give your design a little pick-me-up.


Blend Mode
The Blend Mode allows you to set the blending mode for your Photoshop text drop shadow. Typically you will want this to be Multiply or Linear Burn, so that your shadow darkens the layer behind it.


If you are unfamiliar with how all the different Blending Modes work, I highly recommend checking out the Blending Is Fun Basix tutorial.
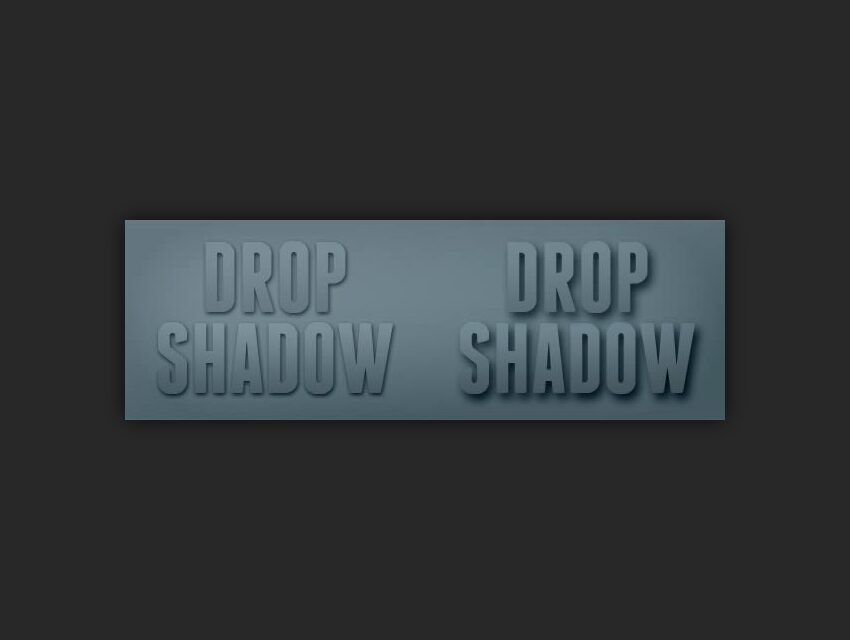
This is also where you set the color of your Photoshop shadow effect by clicking the color block next to the Blend Mode dropdown menu. By default, the shadow color will be black, but you can add a tint of color or even try something outrageous to get special effects.


In the following example of using a shadow effect in Photoshop, you can see that the color of the shadow on the left is black, while the color of the shadow on the right is a dark maroon color. This creates the result you see below. One simple change can make a totally different-looking drop shadow Photoshop style.


Opacity
The Opacity slider allows you to specify how transparent your Photoshop shadow effect will be. A setting of 0% is completely see-through, while 100% is completely opaque.


In the following example of Photoshop text drop shadows, you can see that simply by changing the opacity from 25% to 60%, the drop shadow in Photoshop becomes much more prominent.


Angle
The Angle spinner and corresponding box allow you to change the apparent angle that the light source comes from to create a drop shadow in Photoshop. By turning the “Use Global Light” checkbox on, any changes you make to the angle of the drop shadow will also change the angle of the light sources used in other effects like Bevel and Emboss, Inner Shadow, etc. By leaving it unchecked, you can change the light angle for the Photoshop drop shadow independently of other effects.
The recommended setting is “checked” for most cases, because we want to have a uniform light source for the most cohesive-looking effect.


In the following example, changing the angle of the light source changes the way in which the shadow falls, and since “Use Global Light” is checked, it also changed the light angle for the Bevel and Emboss effect as well.


Distance
The Distance slider changes the apparent distance between the subject and the background. The drop shadow Photoshop effect is achieved by altering the distance between the subject and the drop shadow itself.


In the following example, increasing the distance gives the effect that the text on the left is hovering just above the background while the text on the right is farther away.


Spread
The Spread slider changes the falloff of the drop shadow text in Photoshop in a linear fashion, or in other words, how gradually it fades out at the edges.
For a typical drop shadow effect in Photoshop, you will normally want to leave this at 0%, but for harder shadows you should increase it, and for shadows with hard edges or even extra strokes you can set it all the way to 100%.


In the following example of the drop shadow effect in Photoshop, increasing the spread percentage changes the falloff of the shadow so that it stays darker longer as it fades out at the edge.


Size
The Size slider changes the apparent size of the drop shadow in Photoshop. When it is set to 0, the shadow is exactly the same size as the shape of the object. As you increase the size, the shadow grows in 1 pixel increments.


In the following example, increasing the size of the shadow gives us flexibility over controlling not only the overall size of the shadow, but the softness of it as well. This way, you can use Photoshop to add drop shadows exactly as you need them.


Contour
The Contour shapes allow you to change the falloff of the Photoshop shadow effect in a non-linear fashion. By choosing different curve profiles, you can get the shadow to fade out in different ways.
The only time this is really useful is when you are trying to achieve a special glow or an abstract shadow effect in Photoshop.
In addition, the “Anti-aliased” checkbox allows you to improve the quality of the shadow falloff with a very slight drop in performance. The performance decrease is negligible, so I recommend always keeping the box checked.


In the following example, changing the Contour shape to an inverted “U” results in an odd-looking “halo” Photoshop shadow effect.


Noise
The Noise slider is a useful tool to help you create a drop shadow in Photoshop with a gritty feel. If you are creating a style that is going to resemble dirt or concrete, adding some noise can help the overall effect. For a totally smooth shadow, leave it at 0%.


In the following example, setting the noise to only 15% gives us a pretty substantial amount of grit in the shadow. A good range to use is 0%-25%, as going higher than 25% can often result in a very unnatural look. You can see the difference it makes when you use Photoshop to add drop shadows.


Knock It Out
What in the world does “Layer Knocks Out Drop Shadow” mean? It is simple once you understand the concept, but can be tricky for beginners because it only applies in certain situations. Luckily, this setting is almost always better left checked.


When you create a new layer and apply a Photoshop drop shadow effect to it, you are looking at two things: the layer contents and the layer style. You can hide the layer contents while still showing the layer style by setting the “Fill” in the Layers Palette to 0% for a given layer.
In the following example, both sets of text have their “Fill” set to 0%, but the one on the left has the “Layer Knocks Out Drop Shadow” box checked, while the one on the right does not. The result is that the text on the left creates a type of transparency mask (or “knocks out” the drop shadow), which does not allow the drop shadow to show through. On the other hand, the text on the right does not “knock out” the drop shadow, allowing it to show through.


How to Save and Load the Default Settings
You can save and load default settings for each effect in the Layer Styles dialog box. When you click “Make Default”, Photoshop will store whatever settings are currently active as the new default settings for that effect.
If you click “Reset to Default”, Photoshop will then load whatever settings were last saved. This allows you to experiment and simply reload custom default settings if you want to start over.


Premium Photoshop Shadow Effect Assets From Envato Elements
Now, you’ve learned how to make a drop shadow in Photoshop. However, you may not want to go through all the steps.
If you want some more sophisticated shadow styles in a few minutes, Envato Elements offers a range of Photoshop kits and actions that create realistic shadows for you automatically.
Shadowify Photoshop Kit (ZXP)
Create a drop shadow in Photoshop and bring your game to the next level by using this amazing kit that allows you to make, customize, and apply incredibly natural-looking shadows in a matter of seconds.


Smart Shadow Effect in Photoshop (ATN, PDF)
When it comes to Photoshop actions, this smart shadow one is probably one of my all-time favorites since it allows you to add a great-looking drop shadow to any given text, shape, or smart object. You can use Photoshop to add drop shadows in a few clicks.


Long Photoshop Text Drop Shadow (PSD)
Want to create long drop shadows? There’s no easier way to get the effect you need than this Photoshop action! Even if you aren’t sure how to make a drop shadow in Photoshop, you’ll be able to do it thanks to the three different styles and four angles provided here.


Cinematic Shadow Text Effect: Premium Collection (PSD)
For a more dramatic take on Photoshop drop shadows, try this beauty. Within seconds, you’ll add depth and magnificence to your visual project. With this Photoshop drop shadow download, you get three PSD files with Smart Objects, organized layers, and even a help file to make the work even smoother.


Shadowify 2: Realistic Blur & Shadow Kit (CCX)
This is a second take on the first Photoshop shadow effect asset we saw here. If you can drag a few slides around, you can create a stunning Photoshop drop shadow. This option provides six individual panels, tons of customization, and easy editing.


Expand Your Photoshop Skills
Just started out using Adobe Photoshop and feel like learning more? You can learn every aspect of how to use Photoshop in our free beginners’ course.
Or you can try one of these excellent Photoshop tutorials:


