Why is Google spreadsheet security important? Whether the changes are on purpose or accidental, the best way to prevent them is to implement hard controls in the spreadsheet that leaves your data locked to changes.
In this tutorial, you’ll learn how to lock cells in Google Sheets. You’ll also learn sheet protection to ensure that critical data is never removed from your spreadsheets. Let’s jump in.


Why Protect Your Sheets?
If you want to control who can access the spreadsheet, you need to think about Google spreadsheet permissions. For Sheets, that means that you can control who has a link to view or edit the workbook.
But you can also protect the Sheets and workbooks to control the changes that can be made to the spreadsheet. That’s the focus of this tutorial, and here are some reasons why you might want to do that instead of just preventing access to the spreadsheet altogether:
- Many spreadsheets are structured with “input” cells where you set key variables, and other calculation cells that are based on those inputs. In those cases, keeping the inputs protected makes sense.
- If you’re going to share your spreadsheet with a large audience, it helps if you can “user-proof” the Sheet by locking key cells and ensuring that they aren’t accidentally modified.
- In general, spreadsheets often contain important calculations that you’ll want to ensure are protected from unwanted edits and preserve the integrity of the calculations.
Any of these are reason enough to learn Sheets cell protections. Let’s see how those features work.
How to Protect Google Sheets (Watch & Learn)
Let’s walk through the key techniques to protect cells in a Google spreadsheet in this screencast. You’ll see me apply some of the protection tools to ensure that no unintended changes are made to your spreadsheets.
In this tutorial, you’re going to see that there are really two unique approaches to adding spreadsheet protections:
- You can protect certain cells and ranges, which is useful when you want to let the user make changes to most of the spreadsheet but lock in certain cells.
- You can protect the entire spreadsheet, with the option to set specific cells that you will let the user edit.
Read on for a guide (including screenshots) to applying all of these techniques and more.
How to Lock Cells in Google Sheets
Sometimes, it’s only a certain set of cells that you want to lock up in a spreadsheet. In those cases, here’s how to lock (specific) cells in Google Sheets.
First up, start off by highlighting a cell or range of cells that you want to protect. Then, go to the Data > Protected sheets and ranges menu to start protecting these cells. See the example below for the menu option.


I always recommend giving this protected range a name in the sidebar. For my example, I’ll simply refer to it as Tax Rate. Then, click on Set permissions as you can see below.


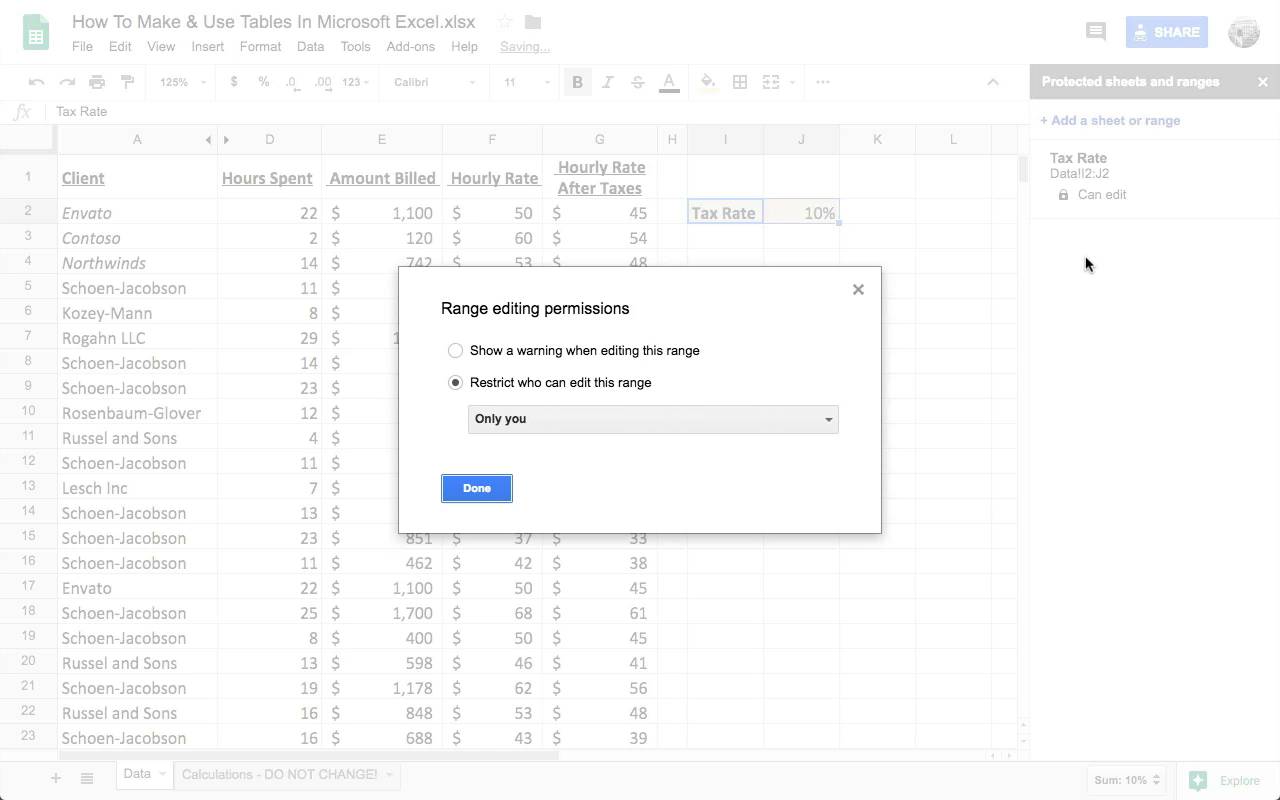
Now, choose the options you want to apply on the next menu I show below. I’ll set it to “Restrict who can edit this range”, and leave it set to “Only you” for this initial example.


Another option is to change the dropdown option to Custom to add more collaborators who can edit this data. Most will be locked out of editing the cells, but anyone you specify can edit the selected range.


One of the advantages of Sheets is the ability to allow some cells to be modified by users that you invite to collaborate. Applying these settings ensures that trusted collaborators can apply updates to the spreadsheet.
Soft Warnings for Editing Cells
What if you don’t want to totally restrict the editing of certain cells? You can show a warning before specific cells are edited to call out that specific cells are important and shouldn’t be changed.
To put a warning on editing cells, follow the same steps covered above to get started. But when you reach the Range editing permissions window, tick the Show a warning… option before you press Done to add the warning.


Each time that these cells are edited, the user will see a warning like the one below, warning that the cells aren’t meant to be edited.


This approach is different from placing hard restrictions on editing a spreadsheet’s cells. It’s more like a warning than a real restriction, and is a good idea when you want to let advanced users make tweaks.
Google Sheet Protection
Now that we’ve learned how to protect individual cells in a Google spreadsheet, let’s tackle the practice of protecting entire sheets. In this approach, the entire sheet is protected by default and you’ll need to specify cells that can be edited.
To protect an entire sheet, browse back to the Data > Protected sheets and ranges menu. This time, you don’t have to select any cells before you start. Just click on Sheet, and then choose the spreadsheet to protect from the dropdown menu.


Now, you’ve protected the entire sheet. Changes won’t be possible unless you allow certain cells (more on that in a minute.) See the screenshot below for an example of what will happen if someone tries to make changes to the sheet.


Want to leave a few cells or ranges open for changes? Let’s learn more about it.
Exceptions to Sheet Protections
When you have an entire spreadsheet protected, you can still allow specific, selected cells or ranges to be edited. If you want most of the spreadsheet protected, I recommend starting off by protecting the entire sheet, and then allowing a few cells to be editable.
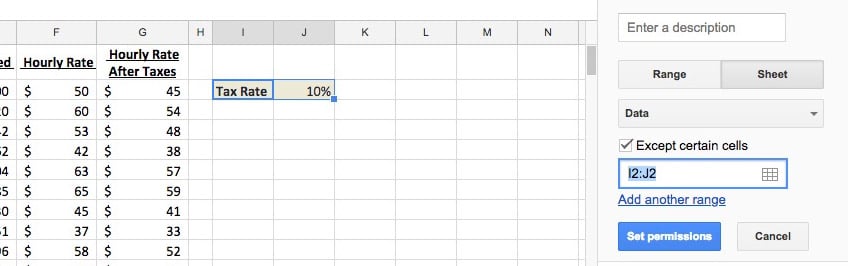
Return to the Data > Protected Sheets & Ranges menu to open up the options. With the Sheet option selected, this time make sure that you tick the Except certain cells option, then click
You can add multiple ranges by clicking on Add another range. Keep adding more selections of cells to allow edits and changes, and click Set Permissions when done.


It’s easy to add these exceptions if you want to allow for some changes in your spreadsheet.
You can manage all of these by returning to that Data > Protected Sheets & Ranges menu. You could add to, remove, or adjust any of the sheet protections that you’ve set up to fine-tune those spreadsheet protections.
Recap & Keep Learning
Spreadsheets are so important that it sometimes becomes crucial that the data in them is protected carefully. When that’s the case, think about the key tools that you can use to ensure that your spreadsheet is protected.
For more tutorials on getting the most from Google Sheets, give some of the tutorials below a look:
How do you protect your Google spreadsheets? Do you restrict users from entering the spreadsheet at all, or are you implementing cell-by-cell or sheet-by-sheet controls? Let me know in the comments section below.


